Tutorial 1: Making Your First Javis Animation!
Introduction
If you are reading this tutorial, I am going to assume this is the first time you are using Javis to create an animation. In that case, welcome to Javis! 😃 By following this tutorial, we are going to make you a director of your very own animations written in pure Julia! 🎬 🎥
If you have not installed Javis yet, please visit the homepage to read the installation instructions.
Learning Outcomes
In this tutorial you'll learn:
- What
Javis.jlis. - How to make a basic animation using
Object. - Move objects created by
JavisusingAction. - Elements of
Luxor.jl.
By the end of this tutorial, you will have made the following animation:

With all that said, let's dive into this tutorial! ✨
So... What Is Javis.jl?
Javis.jl is an abstraction on top of powerful graphics tools to make animations and visualizations easy to create. It is built on top of the fantastic Julia drawing packages, Luxor.jl and Cairo.jl. Cairo.jl is much too complex to explain here, but Luxor.jl gives one the ability to define and draw on a canvas. Luxor.jl provides simple functions like line, circle and poly by which one can make animations.
WARNING: Please make sure not to use the
Luxorpackage within scripts that useJavis!
Do not write using Luxor in your Javis scripts or Julia REPL session as this will result in ambiguity errors. We make sure that every function you will need from Luxor can be accessed by writing using Javis 😉
NOTE: If you're interested in 2D graphics, you should definitely check out the awesome
Luxor.jlpackage. It has a great tutorial that will give you an even greater understanding of howJavis.jlworks.
Prerequisites
In order to use Javis, we will start with the following import:
using JavisThen we need to define a Video
myvideo = Video(500,500) # 500 x 500 // width x heightEvery object and action that we create afterwards is added to myvideo.
Making Our Animation
We need to set-up a few functions that will be able to make our animation!
Our first function is the ground function. The ground function sets the background to white and the "pen" color to black.
function ground(args...)
    background("white") # canvas background
    sethue("black") # pen color
end
NOTE: One may wonder, "why is
args...needed in thegroundfunction?" Each user-defined function gets three argumentsvideo,object, andframeprovided by Javis. These arguments are defined below:
video: Video structobject: Object structframe: the current frame numberAlthough these arguments are irrelevant for the
groundfunction, we need to writeargs...such that Julia actually knows that we have a method that accepts those three arguments. The...basically stands for as many arguments as you want.
Although Luxor.jl provides the functionality to draw circles, Javis does not. We use Luxor.jl to create a function that defines a color for circles and draws the circles accordingly.
Here is how that code looks:
function object(p=O, color="black")
    sethue(color)
    circle(p, 25, :fill)
    return p
end
In general you can use all Luxor functions inside Javis. Javis is just an animation layer on top of it. We therefore highly recommend that you check out the awesome package Luxor.jl which has a nice newcomer tutorial.
The code snippet above defines a function which will be used to animate a circle in the next section. It takes in a point and a color as keyword arguments.
NOTE: You may notice in the
objectmethod, there is a kwarg calledp, standing for the "point" of where to draw the object, which defaults to the letterOfor origin.
This is a shorthand provided by Luxor which is the same as Point(0, 0). If one wishes to be more explicit, one can define the function header as function object(p=Point(0,0), color="black").
Luxor has its default origin in the center of the canvas and the y-axis is pointing down.
We finally draw a filled circle with a radius of 25 and return the point such that Javis can do some more magic. 🪄
Let's Draw a Circle!
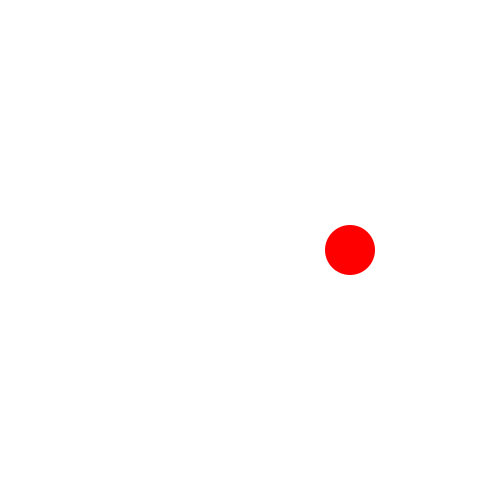
Using our newly found Javis knowledge, we can now draw a circle and render it! We do the following after importing the Javis.jl package and defining our own functions (don't worry if you don't understand the syntax here - it is too advanced for this tutorial but will be explained in future tutorials):
myvideo = Video(500, 500)
Background(1:70, ground)
red_ball = Object(1:70, (args...) -> object(O, "red"), Point(100, 0))

render(
    myvideo;
    pathname="circle.gif"
)
We used Background instead of Object to specify that the ground function is applied to all objects afterwards. The Object functionality gives us the option to define the frames it applies to. Here, it is applied to frames 1 to 70, a function and a starting position.
NOTE One may wonder why we don't use
Point(100, 0)as the point given to theobjectfunction. The reason for this, is that it is often simpler to shift the original frame of reference to a new origin centered at the given point. As an example, functions likeanim_scalealways scale from the origin.
You did it! 🎉 You created your first drawing with Javis! 🔴
The render command that you saw in the previous code snippet renders all the objects defined onto the Video object we defined (myvideo) and outputs it as a gif file.
NOTE: Other formats are supported besides
gif.
Check this out by running julia> ?render in your Julia REPL.
Let's go crazy and draw another object:
myvideo = Video(500, 500)
Background(1:70, ground)
red_ball = Object(1:70, (args...) -> object(O, "red"), Point(100,0))
blue_ball = Object(1:70, (args...) -> object(O, "blue"), Point(200,80))

render(
    myvideo;
    pathname="circle.gif"
)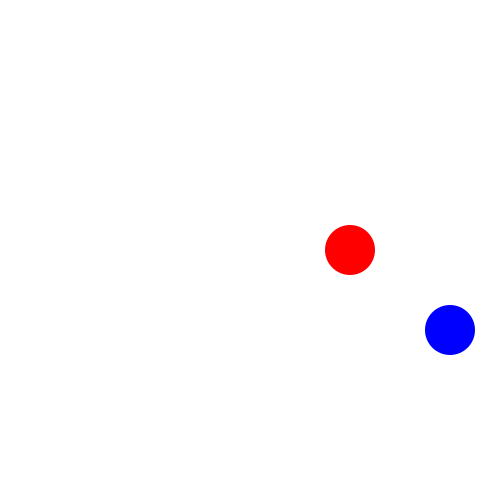
So, this drawing - it's all nice and all, but perhaps a little... Dull? This is supposed to be an animation! Let's make these balls dance. 💃
It Takes Two to Tango 💃
Let's use the function, anim_rotate_around, to produce a ball that rotates in a circle around the origin.
Background(1:70, ground)
red_ball = Object(1:70, (args...)->object(O, "red"), Point(100,0))
act!(red_ball, Action(anim_rotate_around(2π, O)))
The render function stays the same for the rest of this tutorial. Same is true for the myvideo = Video(500, 500) line.

Now that's what I call dancing! However, I think our red ball is a bit lonely, don't you think? It needs a partner!
To make another ball appear, execute the following code snippet:
Background(1:70, ground)
red_ball = Object(1:70, (args...)->object(O, "red"), Point(100,0))
act!(red_ball, Action(anim_rotate_around(2π, O)))
blue_ball = Object(1:70, (args...)-> object(O, "blue"), Point(200,80))
act!(blue_ball, Action(anim_rotate_around(2π, 0.0, red_ball)))
This time we wanted to rotate around an existing object red_ball and in the opposite direction from $2\pi$ to $0$.
There we go!
Mapping an Orbit 🚀
Now, imagine we are astronomers and we model these balls as planets. It would be important to know their orbital trajectories! To do so, let's draw the path that both of the balls take with this new function:
function path!(points, pos, color)
    sethue(color)
    push!(points, pos) # add pos to points
    circle.(points, 2, :fill) # draws a circle for each point using broadcasting
end
NOTE: The
postakes the position of thered_balland passes it as an argument into thepath!function.
Then, using this function, we can execute the following block:
path_of_red = Point[]
Background(1:70, ground)
red_ball = Object(1:70, (args...)->object(O, "red"), Point(100,0))
act!(red_ball, Action(anim_rotate_around(2π, O)))
Object(1:70, (args...)->path!(path_of_red, pos(red_ball), "red"))
Fantastic! That's a pretty regular orbit I must say!
Now, to easily visualize our two "planets" (the red and blue balls), let's connect them together. We can do so by drawing a line that connects both balls:
function connector(p1, p2, color)
    sethue(color)
    line(p1,p2, :stroke)
end
And to show this link:
Background(1:70, ground)
red_ball = Object(1:70, (args...)->object(O, "red"), Point(100,0))
act!(red_ball, Action(anim_rotate_around(2π, O)))
blue_ball = Object(1:70, (args...)->object(O, "blue"), Point(200,80))
act!(blue_ball, Action(anim_rotate_around(2π, 0.0, red_ball)))
Object(1:70, (args...)->connector(pos(red_ball), pos(blue_ball), "black"))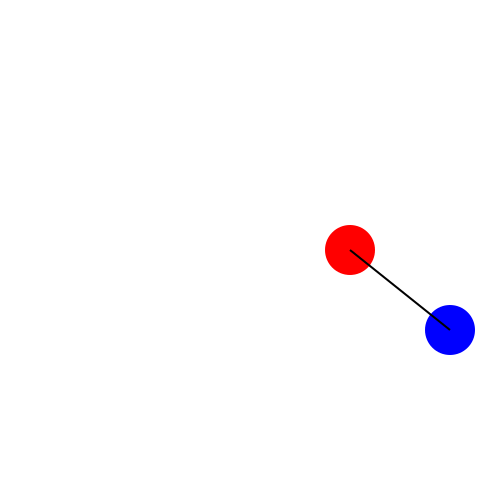
Perfect! Now, let's put everything together to see our orbiting planets' trajectories:
using Javis

function ground(args...)
    background("white") # canvas background
    sethue("black") # pen color
end

function object(p=O, color="black")
    sethue(color)
    circle(p, 25, :fill)
    return p
end

function path!(points, pos, color)
    sethue(color)
    push!(points, pos) # add pos to points
    circle.(points, 2, :fill) # draws a circle for each point using broadcasting
end

function connector(p1, p2, color)
    sethue(color)
    line(p1,p2, :stroke)
end

myvideo = Video(500, 500)

path_of_red = Point[]
path_of_blue = Point[]

Background(1:70, ground)
red_ball = Object(1:70, (args...)->object(O, "red"), Point(100,0))
act!(red_ball, Action(anim_rotate_around(2π, O)))
blue_ball = Object(1:70, (args...)->object(O, "blue"), Point(200,80))
act!(blue_ball, Action(anim_rotate_around(2π, 0.0, red_ball)))
Object(1:70, (args...)->connector(pos(red_ball), pos(blue_ball), "black"))
Object(1:70, (args...)->path!(path_of_red, pos(red_ball), "red"))
Object(1:70, (args...)->path!(path_of_blue, pos(blue_ball), "blue"))

render(myvideo; pathname="tutorial_1.gif")
Do you see any little green men on these planets? 👽
Conclusion
Amazing!!! You have just made your first animation using Javis.jl and we are so proud! I hope you feel like you accomplished something!
To recap, by working through this animation you should now:
- Know how to make a simple animation in Javis
- Understand the difference between
ObjectandBackground - Be able to connect actions together using the object variable
If you want to know more and experiment with Javis, go onto the following tutorials! We wish you the best on your Javis journey!
Author(s): @sudomaze, Ole Kröger, Jacob Zelko
Date: October 16th, 2020
Tag(s): action, rotation, object