Tutorial 4: Rendering LaTeX with Javis!
This is a rather brief tutorial about an exciting functionality of Javis.jl: the ability to render $\LaTeX$!
If you have never heard of LaTeX before, we highly recommend these resources:
When you are done with this tutorial, you will have created the following visualization:
Learning Outcomes
From this project tutorial you will:
- Learn how to render
LaTeXusing Javis.
Set Up
As demonstrated in prior tutorials, we will use Javis to create a Video object. However, we also have one more package included this time - LaTeXStrings!
It is a great package that can be installed via the following command:
julia> ] add LaTeXStringsNow that it is installed, we need to use the following packages for this tutorial:
using Javis
using LaTeXStrings
LaTeXStrings.jl is a tool that allows for the convenient input and display of LaTeX equations using Julia String objects. It requires a special syntax which looks like this:
my_latex_string = L"9\frac{3}{4}"Which would then render to this LaTeX:
\[9\frac{3}{4}\]
Let's define our background function to create the backdrop of our frames:
function ground(args...)
    background("white")
    sethue("black")
end
Since we are making a visualization, we will only generate one frame and set the framerate to 1:
demo = Video(300, 200)
Background(1:1, ground)
render(demo; pathname = "latex.gif", framerate = 1)
Finally, we need to install a node package and additional Julia package for this tutorial. If you are unfamiliar with node, please visit their website for more information to set-up node on your machine.
ATTENTION: This next step is critical or else you WILL encounter numerous errors. If you have not installed node, this tutorial WILL fail for you.
We can accomplish this with the following execution
npm install -g mathjax-node-cliCurrently, Julia does not have the ability (yet) to render LaTeX natively. Therefore, we must install an additional node package. Sadly. 😭
The Writing on the Wall 📝
Now, let's render some LaTeX! To do so, we will define an additional function that we will call, draw_latex. Here is the code:
function draw_latex(video, action, frame)
    fontsize(50)
    latex(
        L"""\begin{equation}
        \left[\begin{array}{cc}
        2 & 3 \\  4 & \sqrt{5} \\
        \end{array} \right]
        \end{equation}""",
        O,
        valign = :middle,
        halign = :center
    )
end
Here is what this function does:
The latex function is called to render a LaTeXString object. This particular string makes a matrix! The positional argument O specifies the top left corner for placing the latex text. The last 2 arguments specify the alignment with respect to the top left corner point. These are optional and default to :top and :left respectively.
NOTE: The default position is the origin (default: the center of the canvas)
We can run this code block to render the LaTeX by adding an Object under the Background line
Object(draw_latex)Which produces the following visualization:
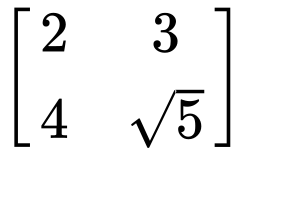
Math-magical! ✨ You just rendered your first bit of LaTeX using Javis! But, I must say, it looks quite... Bland. 😐
Let's spice it up!
Throw it in the Blender!
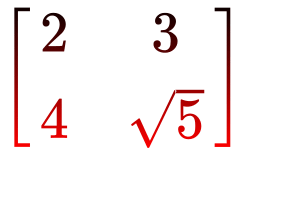
A fun function that Luxor provides is the ability to blend colors together! To do so, let's modify the draw_latex function:
function draw_latex(video, action, frame)
    black_red = blend(O, Point(0, 150), "black", "red")
    setblend(black_red)
    fontsize(50)
    latex(
        L"""\begin{equation}
        \left[\begin{array}{cc}
        2 & 3 \\  4 & \sqrt{5} \\
        \end{array} \right]
        \end{equation}""",
        O,
        valign = :middle,
        halign = :center
    )
end
The biggest change is that we added the blend and setblend functions. blend creates a linear blend between two points using two given colors - in this case, black and red. setblend applies the blend to the drawn object. We also use the translate function this time as it makes writing the blend function easier.
Can you guess what happens when we execute the code with this newly updated draw_latex function? Here is what the output looks like:
Now that matrix looks, AWESOME. 😎
Conclusion
Well done! You just finished a brief introduction to using LaTeX in Javis! There is more you can with Javis and LaTeX which will be explored in future tutorials.
As a reminder, you just learned how to render LaTeX using Javis! Go forth and produce more wonderful $\LaTeX$ creations!
Full Code
In case you ran into any issues or confusion, here is the full code:
using Javis
using LaTeXStrings

function ground(args...)
    background("white")
    sethue("black")
end

function draw_latex(video, action, frame)
    black_red = blend(O, Point(0, 150), "black", "red")
    setblend(black_red)
    fontsize(50)
    latex(
        L"""\begin{equation}
        \left[\begin{array}{cc}
        2 & 3 \\  4 & \sqrt{5} \\
        \end{array} \right]
        \end{equation}""",
        O,
        :middle,
        :center
    )
end

demo = Video(300, 200)
Background(1:1, ground)
Object(draw_latex)
render(demo; pathname = "latex.gif", framerate=1)
Author(s): Jacob Zelko
Date: August 16th, 2020
Tag(s): latex, blend, LaTeXStrings, node